Parents have a great tool at their disposal these days, which helps make long car journeys or restaurant trips a little easier. The internet gives us instant entertainment at our fingertips, and though it’s not the preference of every parent to sit their kids in front of a tablet or smartphone, it sure can be useful. One of the most handy applications to have downloaded when it comes to entertaining the children is YouTube.
There’s an endless world of content on YouTube for people of every age, and that includes children. But as we saw recently with the Momo challenge, there are times that you might want to exert some control over the videos that family members can access on the video sharing platform. Luckily there are parental controls you can use to lock down potentially offensive or frightening content, and today we’re going to tell you how to set them up so that you can safeguard your children.
Using ‘Restricted Mode’ on YouTube
YouTube has a range of built-in parental settings that are grouped under a feature known as ‘Restricted Mode‘. When this setting is enabled, YouTube activates a range of functions to automatically filter out videos that aren’t deemed suitable to children. These include age-restriction controls, as well as community flagging — the latter feature allows members of the community to tag videos that are deemed as offensive. What’s more, Restricted Mode is integrated with Google SafeSearch, so when you enable these parental controls, you’re also simultaneously turning on SafeSearch for Google.
Additionally, you won’t have to worry about your kids simply logging into another account. The feature works directly in your web browser, so as long as your kids are using the browser in which you’ve enabled the settings, they will be protected. But if more than 1 browser is installed on your PC, be sure to enable it for the others, too. You’ll also want to enable it on any mobile devices used by the kids, but we will cover this in detail, below.
Enabling Restricted Mode in your browser
These steps are for families using the PC or laptop to browse videos on YouTube. They can be followed to enable YouTube’s parental control suite in any browser that you use.
- Open a new browser session and navigate to the YouTube website.
- Once the website has loaded, click on the ‘Log In’ button at the upper-right of the page.
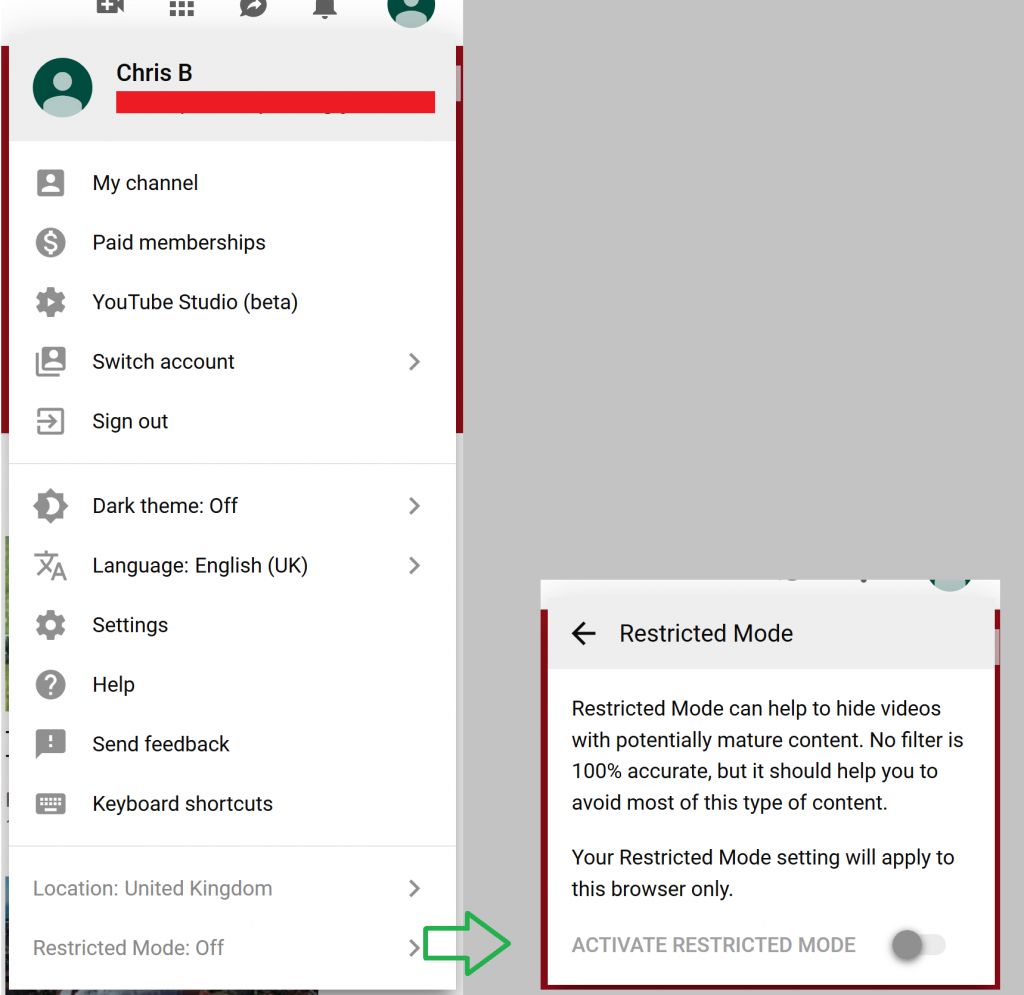
- After logging in — you may already be logged in if you have a Google account — you can click on the user icon to reveal the below menu.

- Click on the option at the very bottom of the menu that states ‘Restricted Mode: Off‘. This will open a new menu that will allow you to turn on the setting for that browser only.
- In case you have tech-savvy kids, you can also then opt to lock the setting so that it can’t be disabled again. To do so, you’ll have to input your account password for your Google / YouTube account.
Enabling Restricted Mode on your mobile
Enabling this setting on your mobile is very straightforward and practically the same as enabling it on a PC or laptop browser. You can do it for any YouTube application that’s installed on a mobile phone or tablet. Simply tap on the same user icon on your YouTube app, once you’ve logged in. Rather than having its own option within the menu bar, you’ll need to tap on Settings first.
Then, it’s simply a case of tapping on the ‘Restricted Mode‘ On/Off toggle to enable the feature. Again, you’ll have to make sure that this is done within the kids’ accounts.
If you get stuck anywhere along the way and would like to be talked through the process, then you can get in touch with us at WiseGuys on 0808 123 2820. We can talk you through the other parental controls available on your mobile and mobile applications.


Recent Comments